Inventory count allows to verify that the store balance calculated by Compucash and the actual store balance are the same and if not, make corrections.
Starting the inventory count
A new inventory count can be started by clicking “New inventory count” button under inventory count.

Firstly, a store(1) has to be selected, by default Compucash will select the store that’s currently active.
Store state time sets the amount in store in the inventory count to be what the store balance was in the selected moment which can either be the current moment(2) or specific time(3). This means inventory counts can be inserted to Compucash after the actual counting has taken place. Specific time should be selected in that case. Reports will reflect the store state time as the time the inventory count was done, actual store state however will be changed when accepting the inventory count.
To keep the Compucash store balance and actual store balance as close to each other as possible the time between store state time and inventory count accepting should be minimal.

Inventory count will lock store balance, not allowing to make any changes to the store before the store state time, which means after creating an inventory count, changes to the store balance cannot be made before the store state time. If any delivery notes altering the selected store have a document date set before store state time they cannot be accepted after opening up the inventory count.
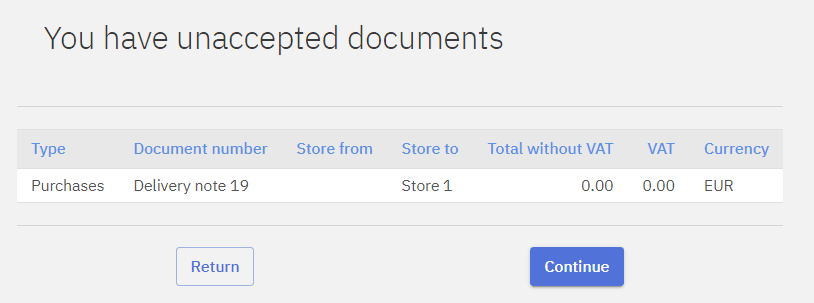
In this situation a document date conflict warning window is displayed, and it is recommended to either delete or accept the documents listed in the warning before continuing.

Counting the inventory
Inventory count can be partial so when counting the inventory not all products have to be counted. Products that have “Counted quantity” field left empty will not have their store balance changed.
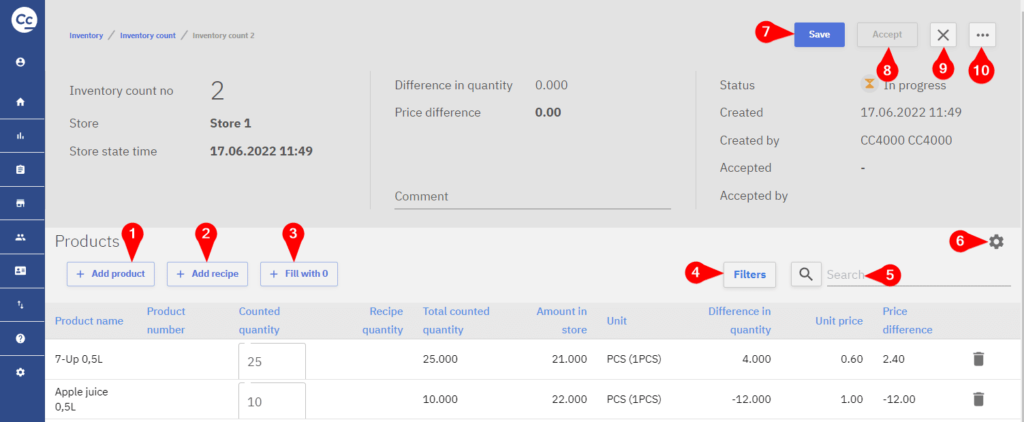
1 – By default inventory count will only list products that have been in the store, if a product can’t be found in the list it can be added by clicking “Add product”.
2 – If a recipe product is in the counted in the actual store “Add recipe” can add the quantities of components in a recipe to the inventory count
3 – Fill with 0 will fill either all or products that have “Counted quantity” set as empty with zeros, this is useful when resetting the store balance.
4 – Filters allow to filter the list of products by their product group
5 – Search function can be used to find specific products
6 – The layout menu is used to edit the columns’ visibility, allowing to hide unnecessary fields. The order of the columns can also be configured.
7 – When leaving the inventory count page unsaved changes are lost, inventory count can be saved and continued later
8 – Accepting locks the inventory count, preventing any further changes and sets the store balance to reflect the count, this action cannot be undone
9 – Exits the inventory count
10 – Additional options like printing, saving to file and deleting. Deleting cannot be undone and all changes made to the inventory count will be lost. Inventory count can only be deleted when it’s not accepted, after accepting the count deleting will no longer be possible
